Mini Monster Cakes (Halloween Cakes)
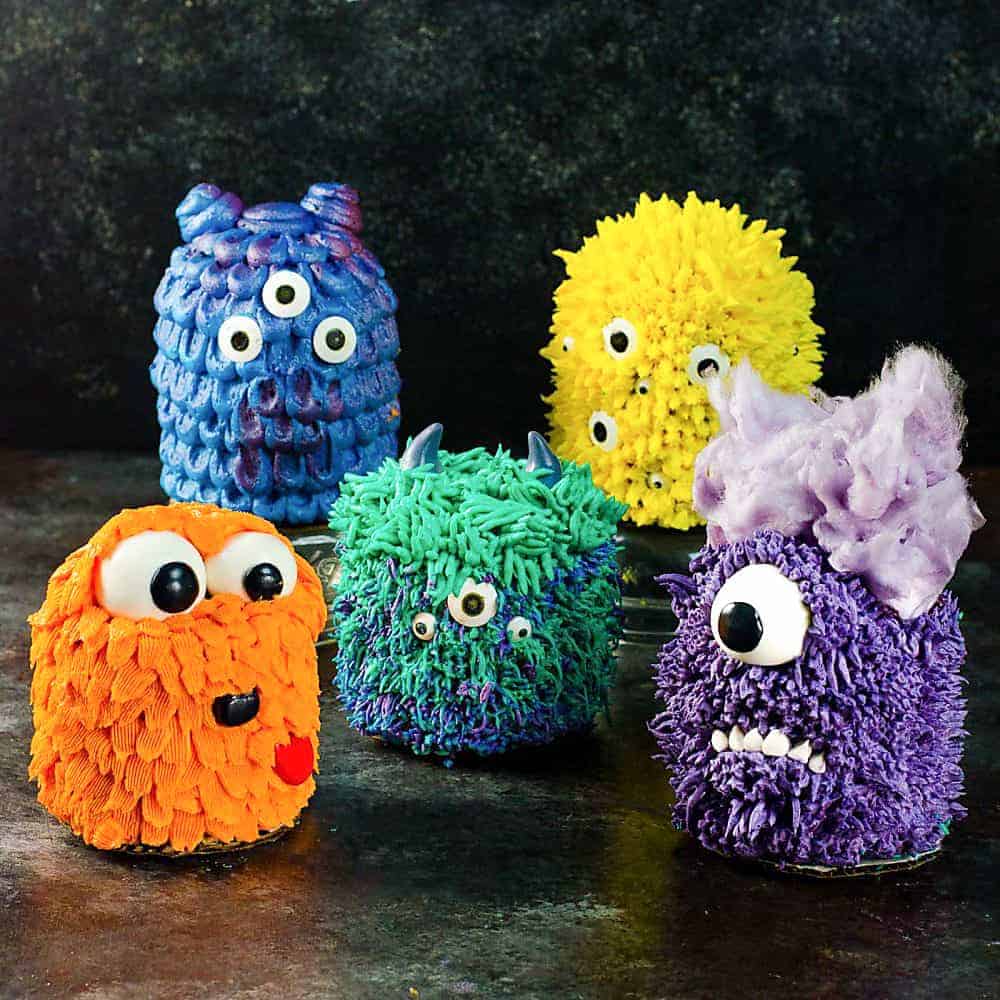
Ingredients
- 455 g unsalted butter (4 sticks / 2 cups (Melted))
- 52 g oil (¼ cup)
- 680 g white sugar (3 ⅓ cups)
- 8 large eggs
- 240 mL milk (1 cup)
- 2 tsp vanilla extract
- 1 tsp sea salt
- drops black food coloring (optional)
- 150 g black cocoa (or dutch cocoa)
- 400 g AP flour (about 3 ¼ cups)
- 4 tsp baking powder
- 1.02 kg unsalted butter (4.5 cups / 9 sticks (softened))
- 1.36 kg confectioner's sugar ( 12 cups (spoon and leveled, and sifted))
- 1 tsp sea salt
- 1.5 tbsp vanilla extract
- ¼ cup chilled heavy whipping cream (35% fat)
- Gel colors (I used Orange, Yellow, Teal, Blue, Purple)
- Medium candy eyes
- Large candy eyes
- White gum paste / fondant
- Black gum paste / fondant
- Grey gum paste / fondant
- Red gum paste / fondant
- Silver and purple airbrush paint (optional)
- Popsicle stick
Steps
- 1
Preheat the oven to 325°F/163°C. Line the bottom of a 18 x 13 inch tray or two 9 x 13 inch pans with parchment paper. Butter the sides and dust with some cocoa powder.
- 2
Mix the melted butter, oil, sugar in a bowl until well combined.
- 3
Add in the eggs, followed by the milk, vanilla and salt. Whisk until well combined. If you aren't using black cocoa powder, then you can also add some black food coloring to darken the batter.
- 4
In a separate bowl, sift the flour, cocoa and baking powder together.
- 5
Add the dry ingredients to the wet ingredients in 2 - 3 additions, and fold in the ingredients to mix well. Do not over-mix.
- 6
Pour the batter into the prepared half sheet tray until ¾ full.
- 7
Bake in the preheated oven for 20 - 30 minutes until the cake is springy to the touch and an inserted toothpick comes out clean.
- 8
Remove from the oven and let the cake cool down. Once cooled down, cover and refrigerate for a few hours to make it easier to cut the cake layers.
- 9
Using a 3.5 inch pastry cutter, cut 12 rounds from the sheet cake. Remove the cake rounds and place them on a tray. Keep them covered and refrigerated until needed.
- 10
Crush the rest of the cake scraps to crumbs and add about ½ cup of frosting. Using a spatula or your hands (easier with your hands), mix in the buttercream with the cake crumbs to form a cake pop dough that you can mold.
- 11
Divide the cake pop dough into 3 portions. Form a ball with each portion that is 3.5 inches in diameter.
- 12
Cut each sphere in half and form the half spheres. Cover and leave in the fridge until needed.
- 13
Place the softened butter and salt in a cake mixer bowl. Using the whisk attachment, whisk the butter until very light and fluffy. This can take up to 10 minutes. Add the vanilla and whisk to mix.
- 14
Add the confectioner's sugar (one cup at a time) and whisk together until it’s all mixed in. Scrape down the sides from time to time. Whisk for a few minutes until you have a light and fluffy frosting.
- 15
If needed, add up to ¼ cup of heavy cream to make the frosting fluffier. But keep in mind that food coloring will be added later too (so you don't want to add too much liquid).
- 16
Divide the frosting into 5 portions and color each with a bright color of your choice.
- 17
Place the colored frosting in piping bags and set aside until needed.
- 18
Place 1 cake layer on the decorating tray. Spread a thin layer of frosting and top with a second cake layer. Add a layer of crumb coating frosting (to trap the cake crumbs). If you want your cake to have a domed top, place a half sphere on top and crumb coat the surface.
- 19
Repeat with the rest of the cake layers with different buttercream colors.
- 20
Chill the cakes for a few hours until the frosting is set.
- 21
Eyes - form 2 x 1.5 inch and 1 x 1 inch diameter white gum paste balls (if you want uneven eye balls, like in Monster 5). Make smaller black fondant discs, and stick them on the white gum paste balls using a little water. You can make as many eyes as you want, in any size. Attach the eye balls to toothpicks and let them dry for about a day.
- 22
Teeth - form little triangular white gum paste pieces for teeth. Make sure the teeth are thick so that they stick out from the monster.
- 23
Horns - form 2 x 1 inch grey gum paste balls. Form 2 horn shapes with a flat bottom. Attach toothpicks to the bottoms of the horns. Let them dry for about a day.
- 24
Tongue - using red gum paste, form a tongue shape that is about 1 inch long.
- 25
Nose - form a little ½ inch black gum paste oval ball for the nose.
- 26
Take a chilled cake without the domed top. Add one large eye ball on top of the cake (towards the top end).
- 27
Pipe some purple buttercream behind the eye to secure it to the cake surface. Using a small spatula, smoothen the buttercream.
- 28
Pipe a little frosting where the mouth will be to create a “ledge” for the teeth. I shaped the ledge to be a frown and then stuck the teeth on top.
- 29
Using the big grass tip 234, squeeze purple buttercream onto the cake to create the fur look. Pipe the fur all over the cake as shown in the recipe video. Just leave a gap on top for the purple candy floss hair.
- 30
Refrigerate the cake until needed. Top the cake with candy floss just before serving.
- 31
This monster will be made with a mini cake with a domed top. Using a little buttercream, stick medium and large eyes all over the monster.
- 32
Using the open star tip 18 with yellow buttercream, pipe spikes all over the cake. To create long spikes, squeeze the buttercream onto the cake and gently pull back while releasing pressure.
- 33
Pipe shorter spikes around the eyes, and alternate the sizes of the eyes on the body. Pipe longer spikes on the top if you prefer.
- 34
Refrigerate until needed.
- 35
For this cake, you can use just blue colored buttercream, OR create a dual color effect by adding blue and purple frosting in a piping bag, with the 2A or 1A round tip attached.
- 36
Starting from the bottom, pipe dollops of buttercream along the bottom edge of the cake. Using a popsicle stick, spread the buttercream upwards as shown in the recipe video.
- 37
Second row, pipe dollops of buttercream between the buttercream scales in the first layer. Repeat with the popsicle stick as before. Repeat until you get to the top of the cake. Pipe a big swirl right on top and flatten it with a spatula or popsicle stick.
- 38
Stick on 3 large candy eyes and pipe 2 big “ears” on top of the cake.
- 39
Let the cake set in the fridge for a few hours.
- 40
Air brush the cakes lightly with silver airbrush paint and purple airbrush paint mixed together.
- 41
Let it dry.
- 42
Two different tips were used for this cake - the larger grass tips (big grass tip 234 or Russian grass tip for the hair, and the small grass tip 233 for the body).
- 43
Teal buttercream and purple buttercream are placed in a pastry bag with the small grass tip 233 attached for the dual colored fur. Pipe the fur to cover the entire body of the cake. Don’t worry about it being messy.
- 44
Pipe teal colored hair on top of the cake using the big grass tip 234 or Russian grass tip.
- 45
Stick on the candy eyes for the face and horns on top. Refrigerate until needed.
- 46
Stick two uneven fondant eyes on top of the cake surface (in the center). Pipe frosting behind the eyes to secure them on to the cake surface. Smoothen the buttercream using a spatula.
- 47
Pipe the raggedy fur using the basket weave tip 48. Starting from the bottom of the cake, make short vertical strokes as shown in the video. To create more dimension, vary the piping angles slightly. Pipe the second layer of buttercream overlapping the bottom layer slightly. Repeat until you get to the top. You should end up with very scraggly looking fur. Along the edges of the cake at the top, pipe the buttercream so that it droops over the edge. Continue until you get to the eyes (see photo for details).
- 48
Add a black nose and the red tongue. Pipe a few short strokes of the buttercream over the tongue and nose to blend them in. Refrigerate until needed.